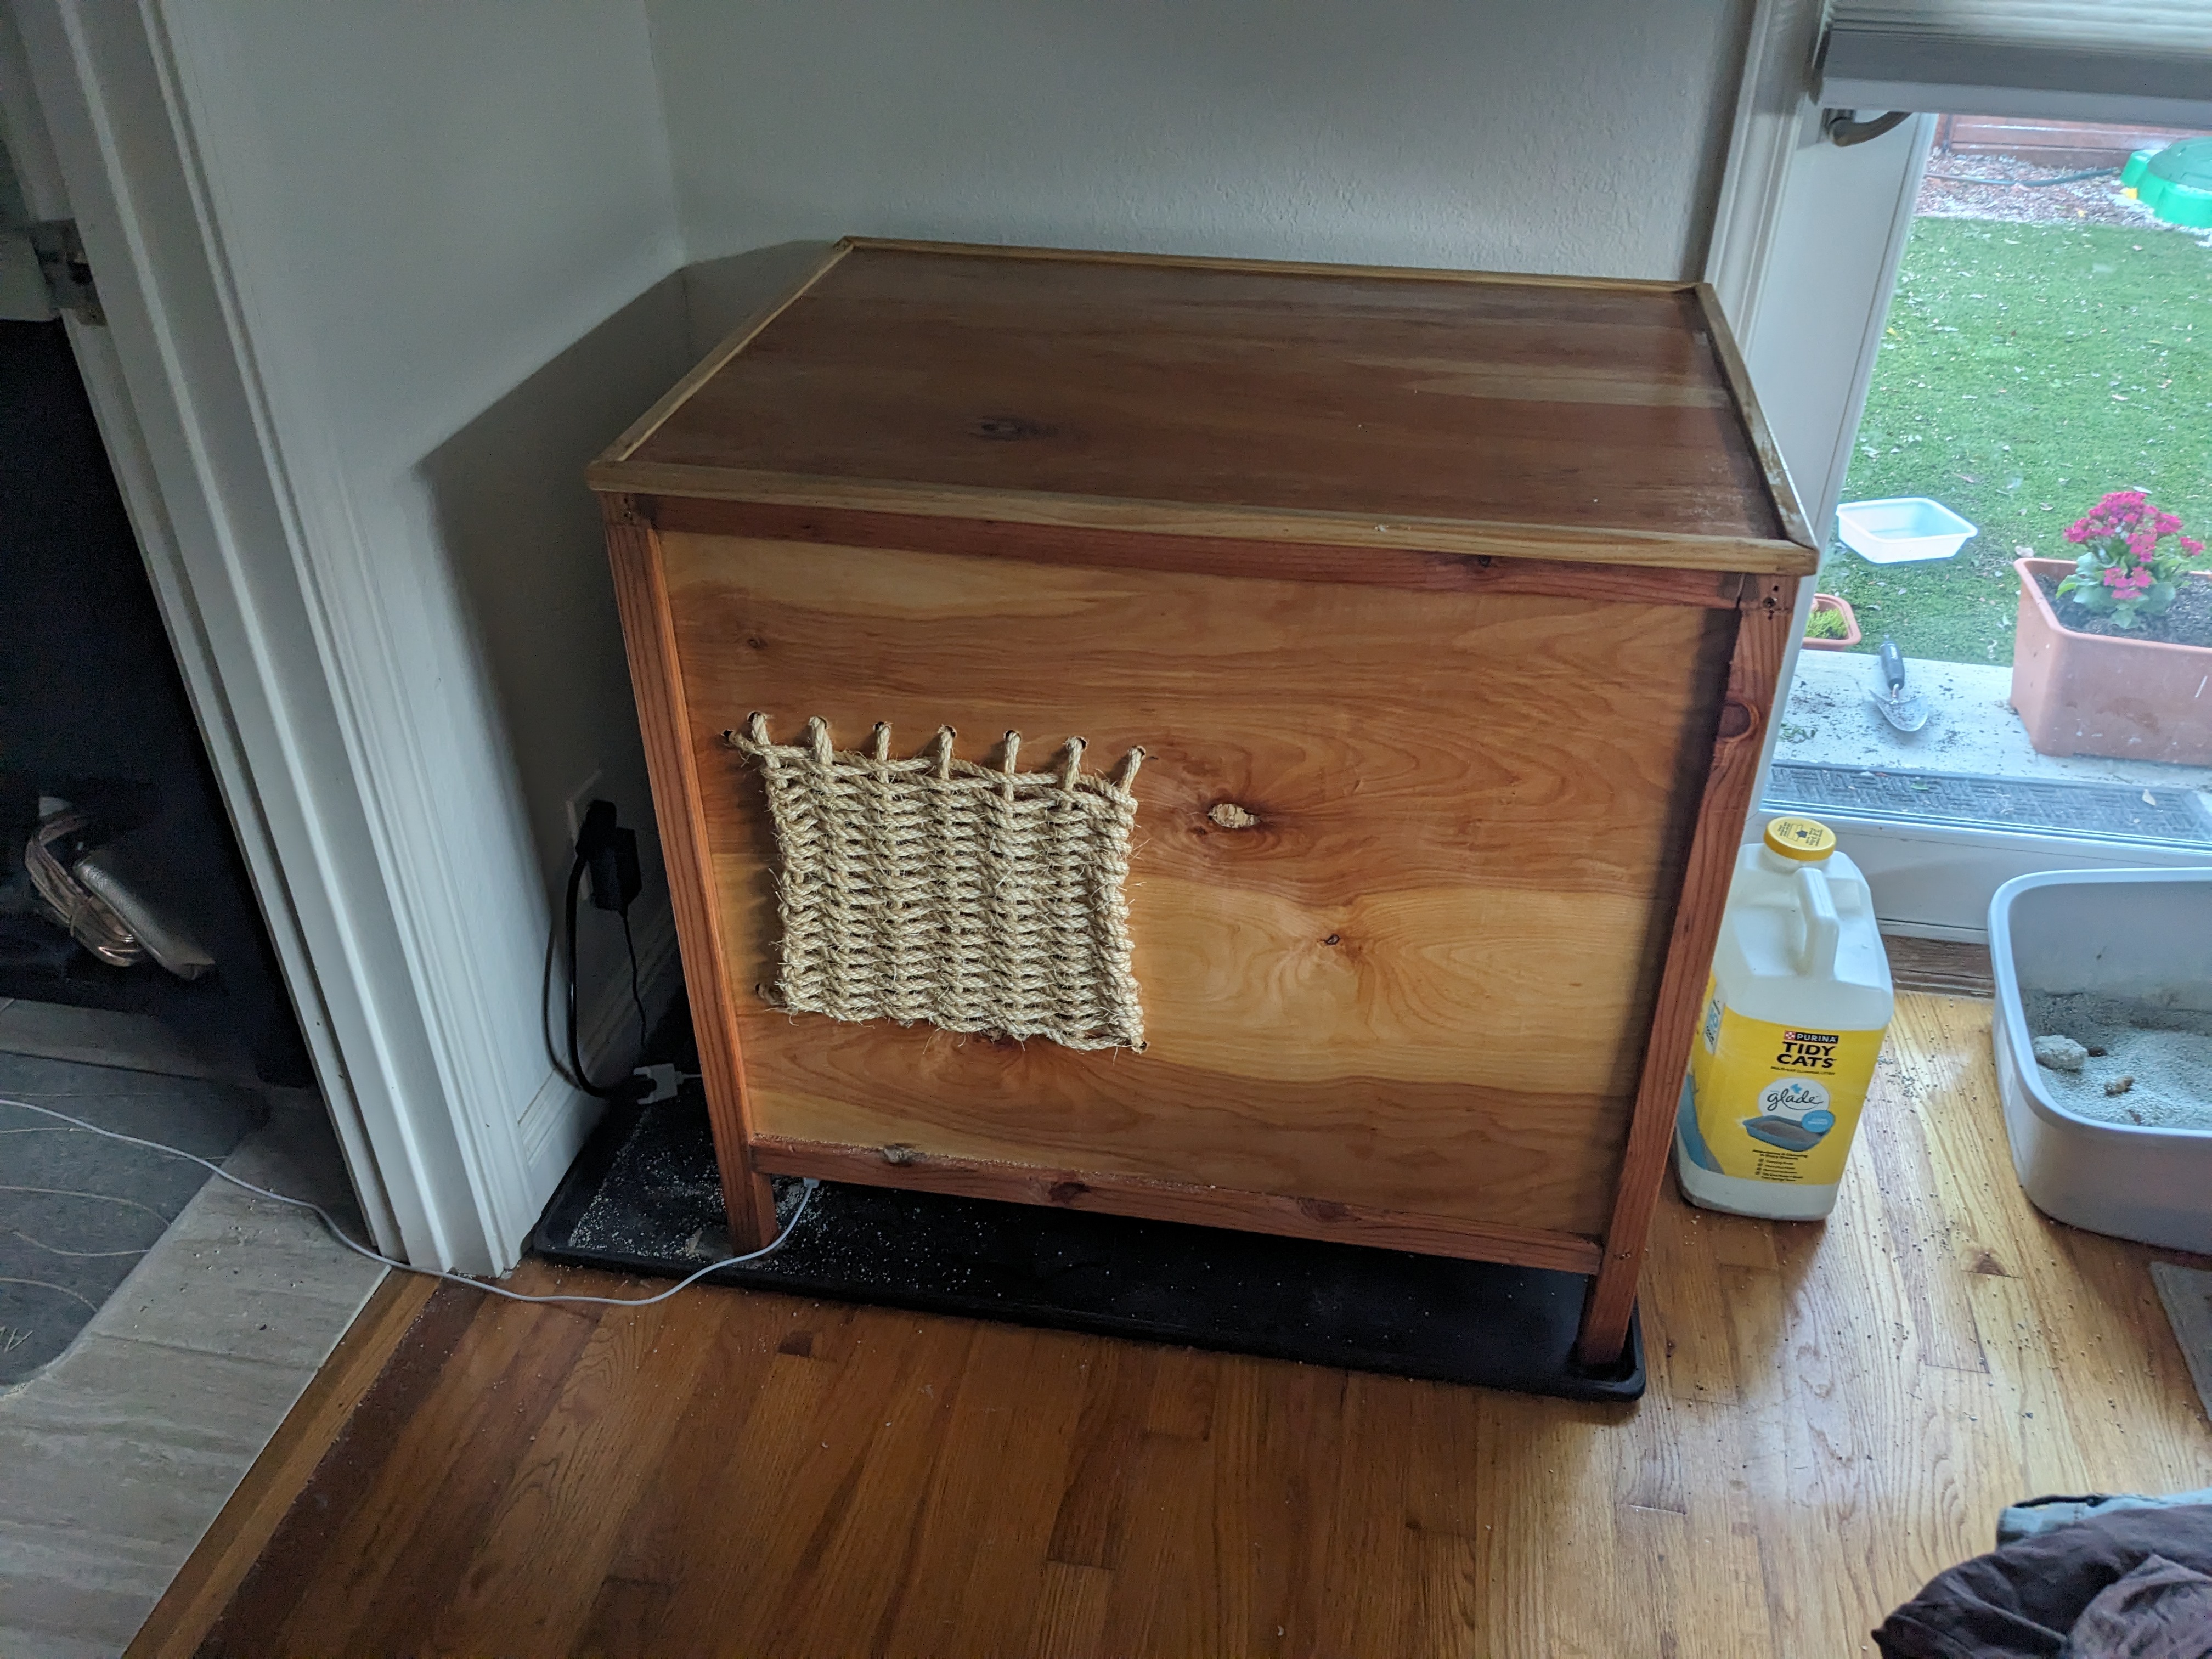
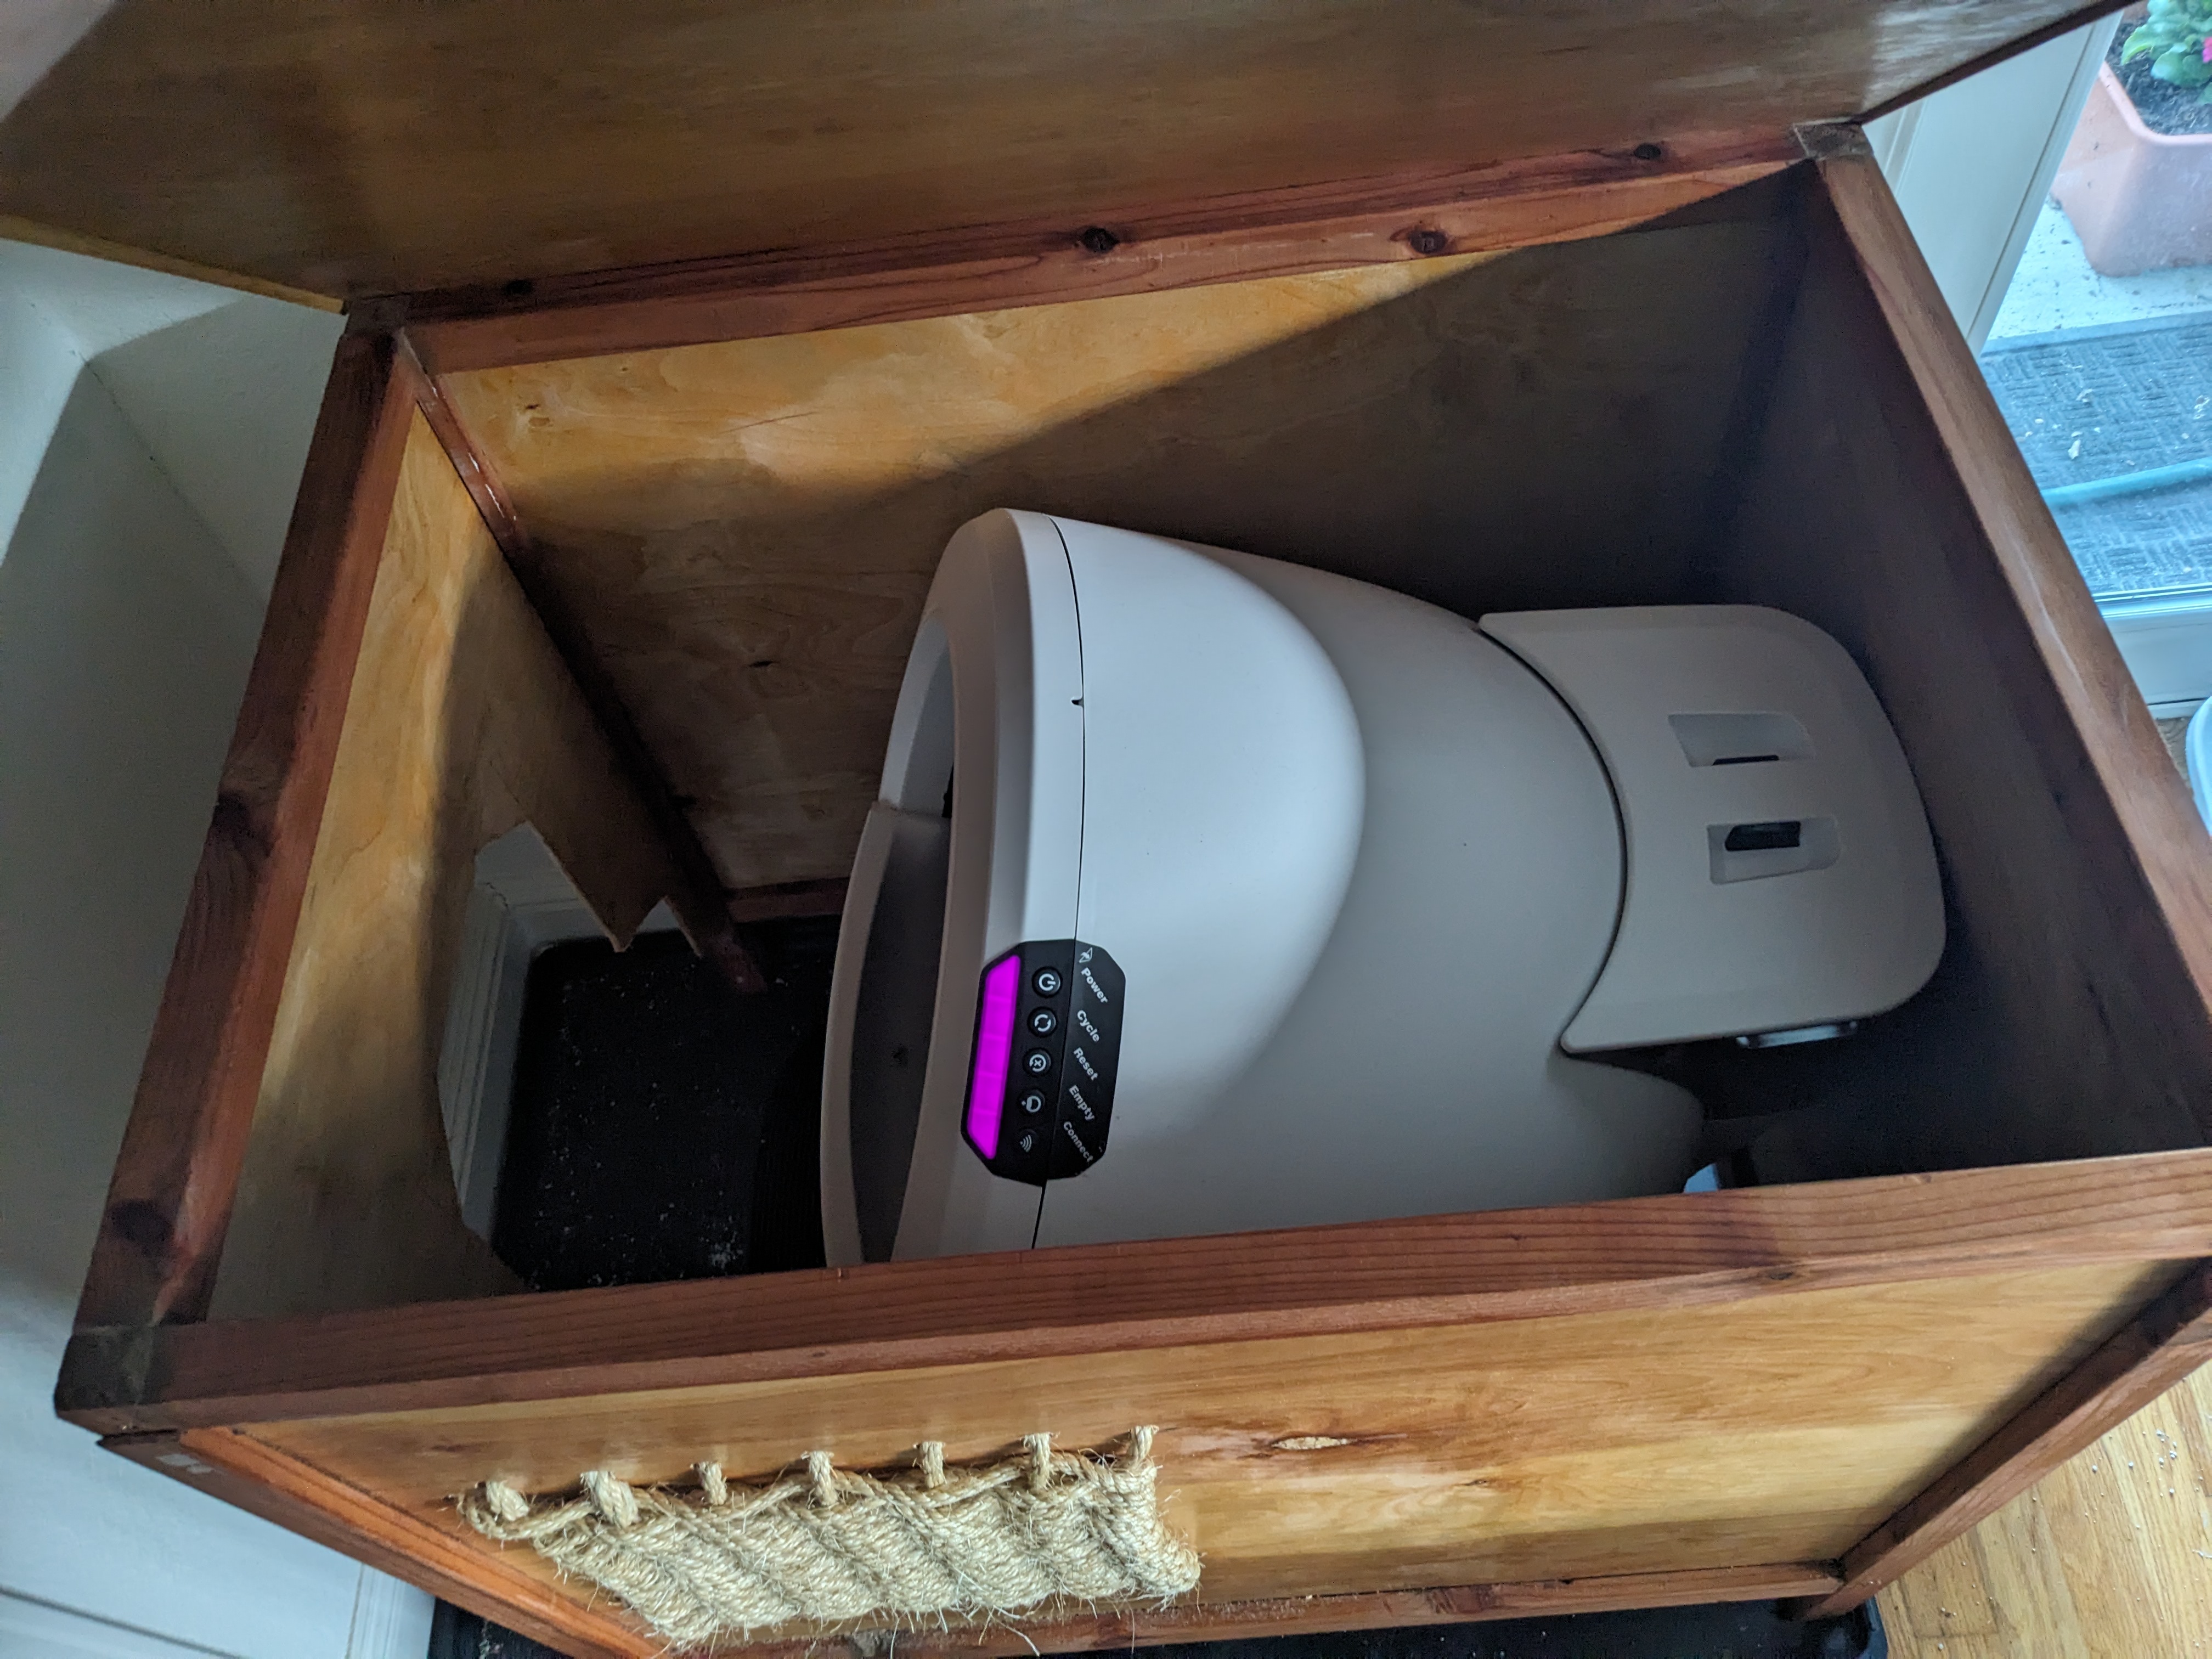
I finally scooped one scoop too many and decided to get a Litter Robot for my cats. It took me so long to get one because the robot is big and I couldn’t find a hutch or cabinet for sale that would fit it. Once I bought the robot, it was time to start designing the cabinet for it. Why use a cabinet? Well it serves as a surprisingly good toddler deterrent and it also doubles as a table.
The cabinet is 32″ width by 24.5″ deep by 30″ tall. This cabinet used 2″x2″ redwood lumber with 1/4″ birch plywood, joined using a 1/4″ dado groove cut into the redwood. The scratch pad on the side is woven out of 3/8″ sisal rope.
So far only one out of two cats is using it – please send your brave cat energy to us!
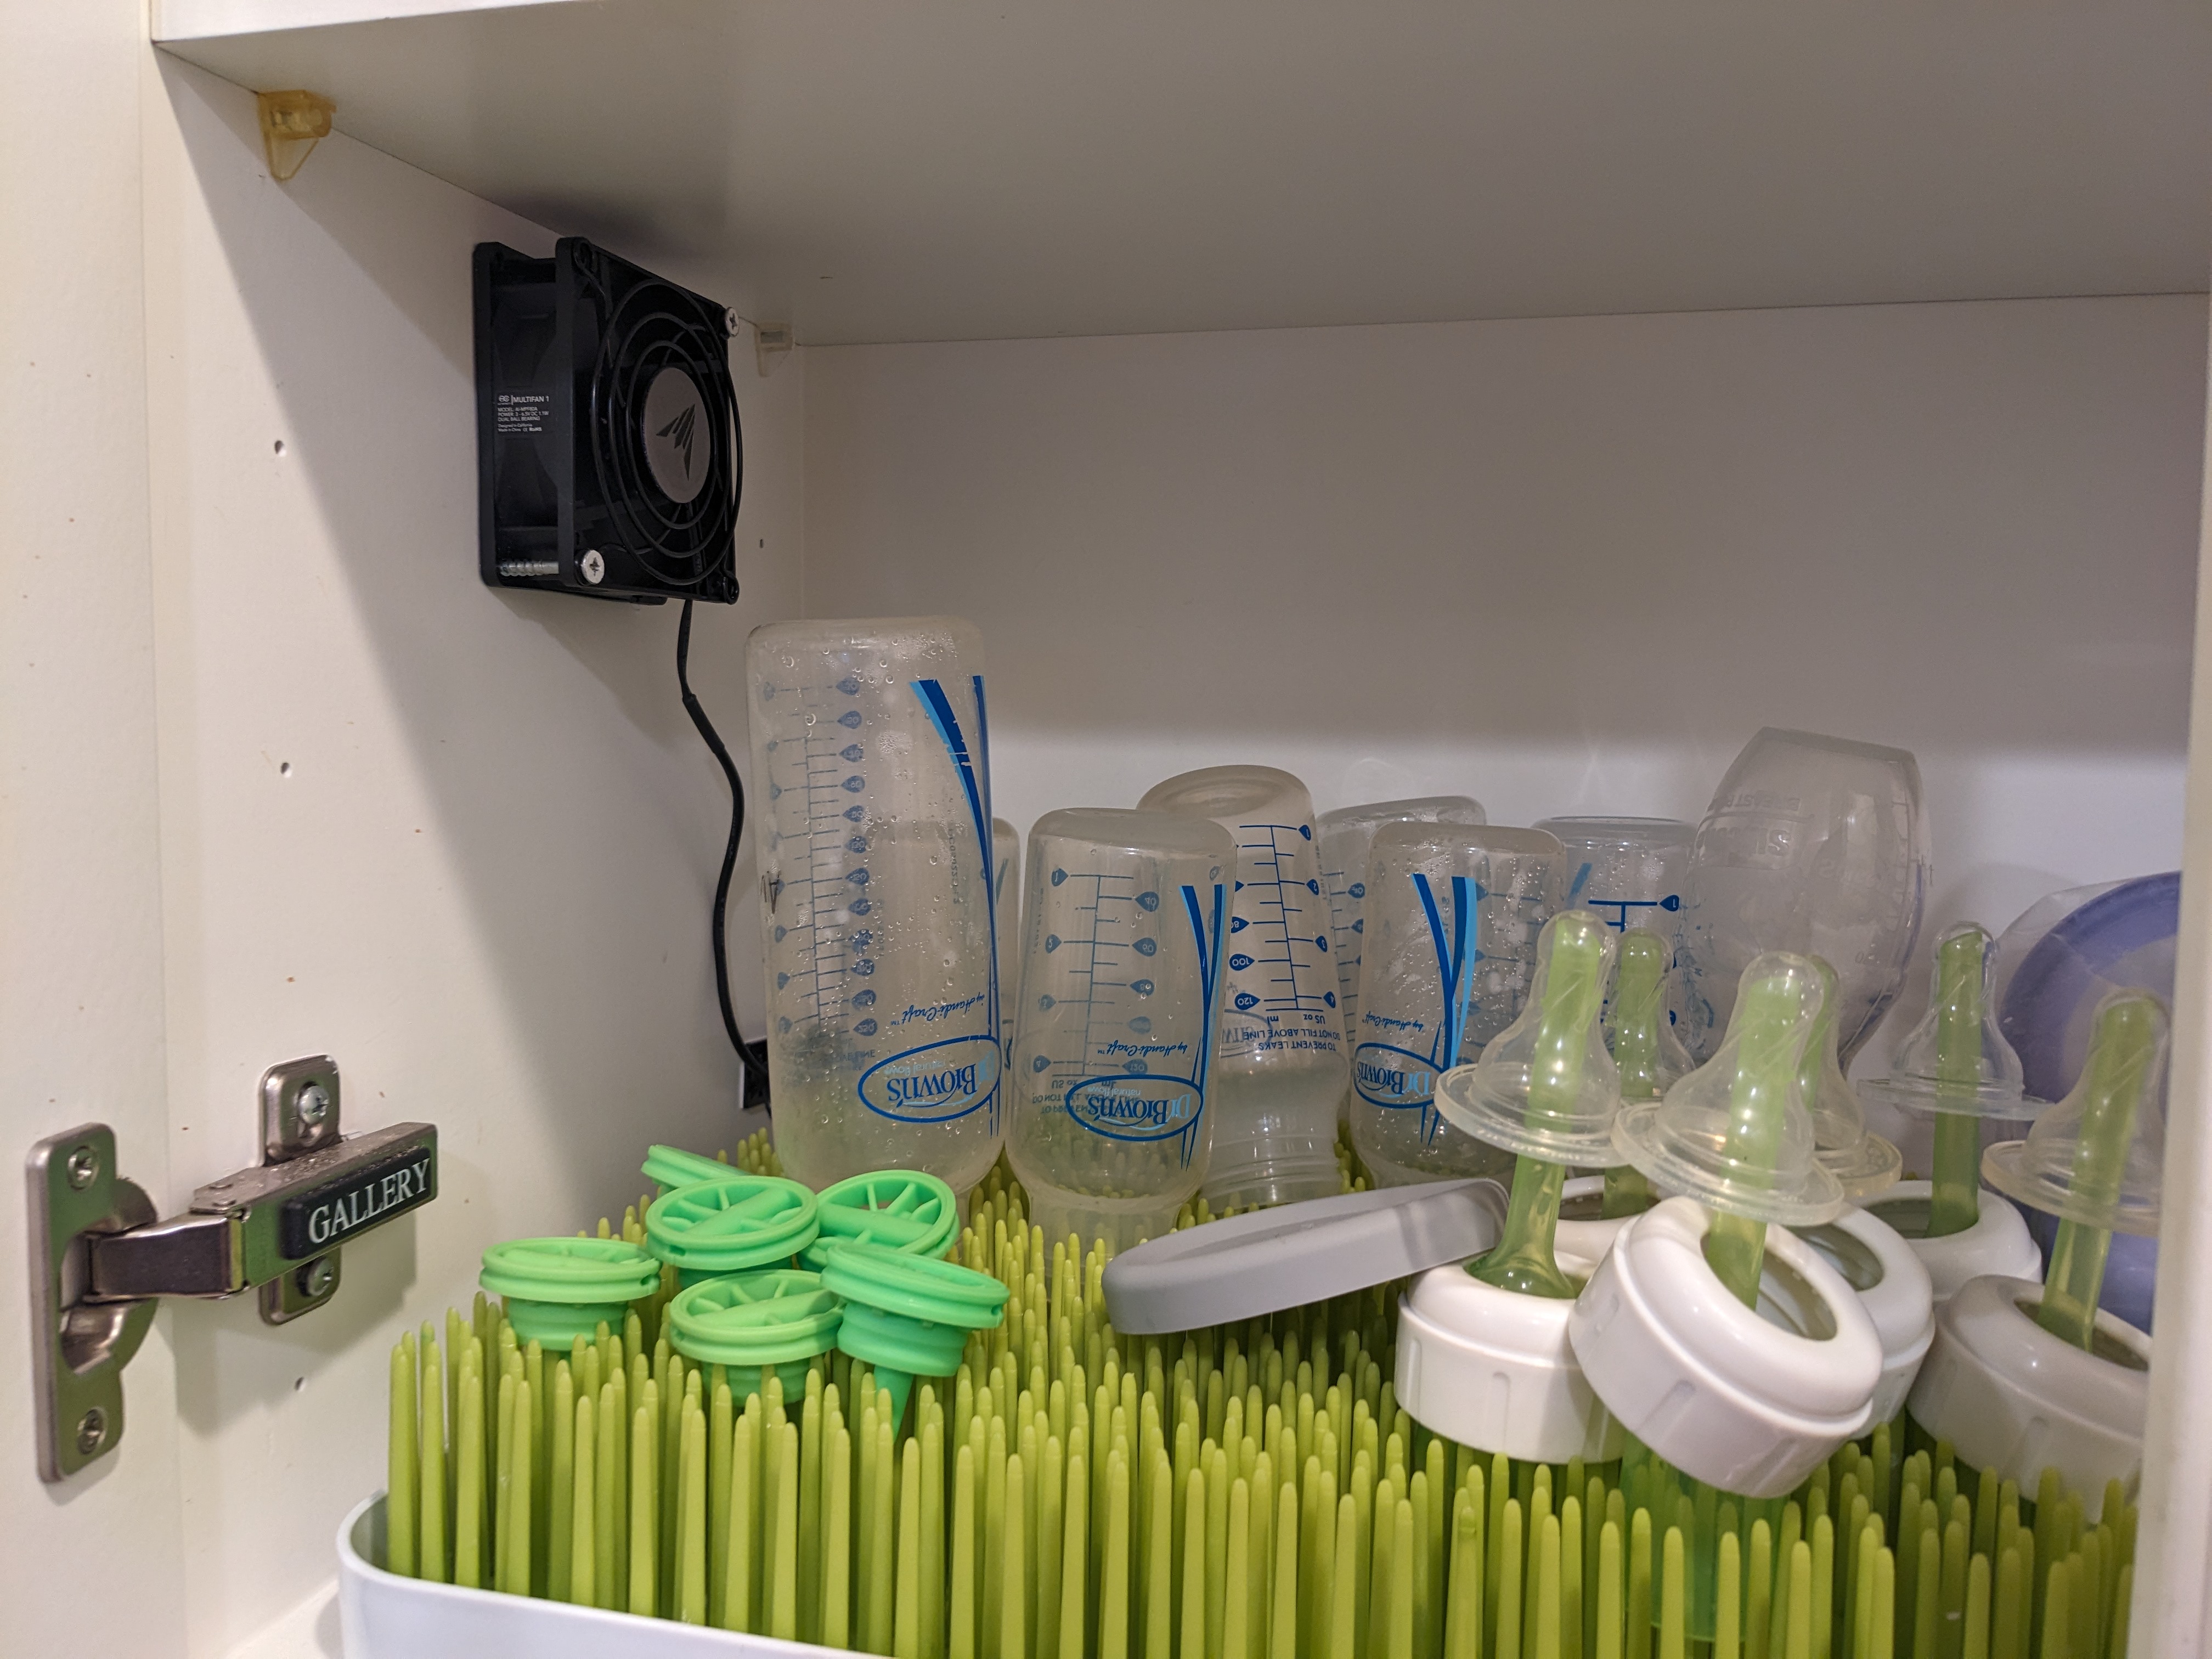
If you have an infant, maybe you’ve dealt with scenario: you want countertop space but you need the bottles to dry and you don’t have time to manually dry the bottles.. again. What to do? Well if you can give up some cabinet space and drill a few holes, here’s a solution to consider.
With a few discrete air holes on the outside and a computer case fan on the inside, wet bottles and mildew can be a distant memory. You never know what kind of projects will kick off when nesting with an infant!
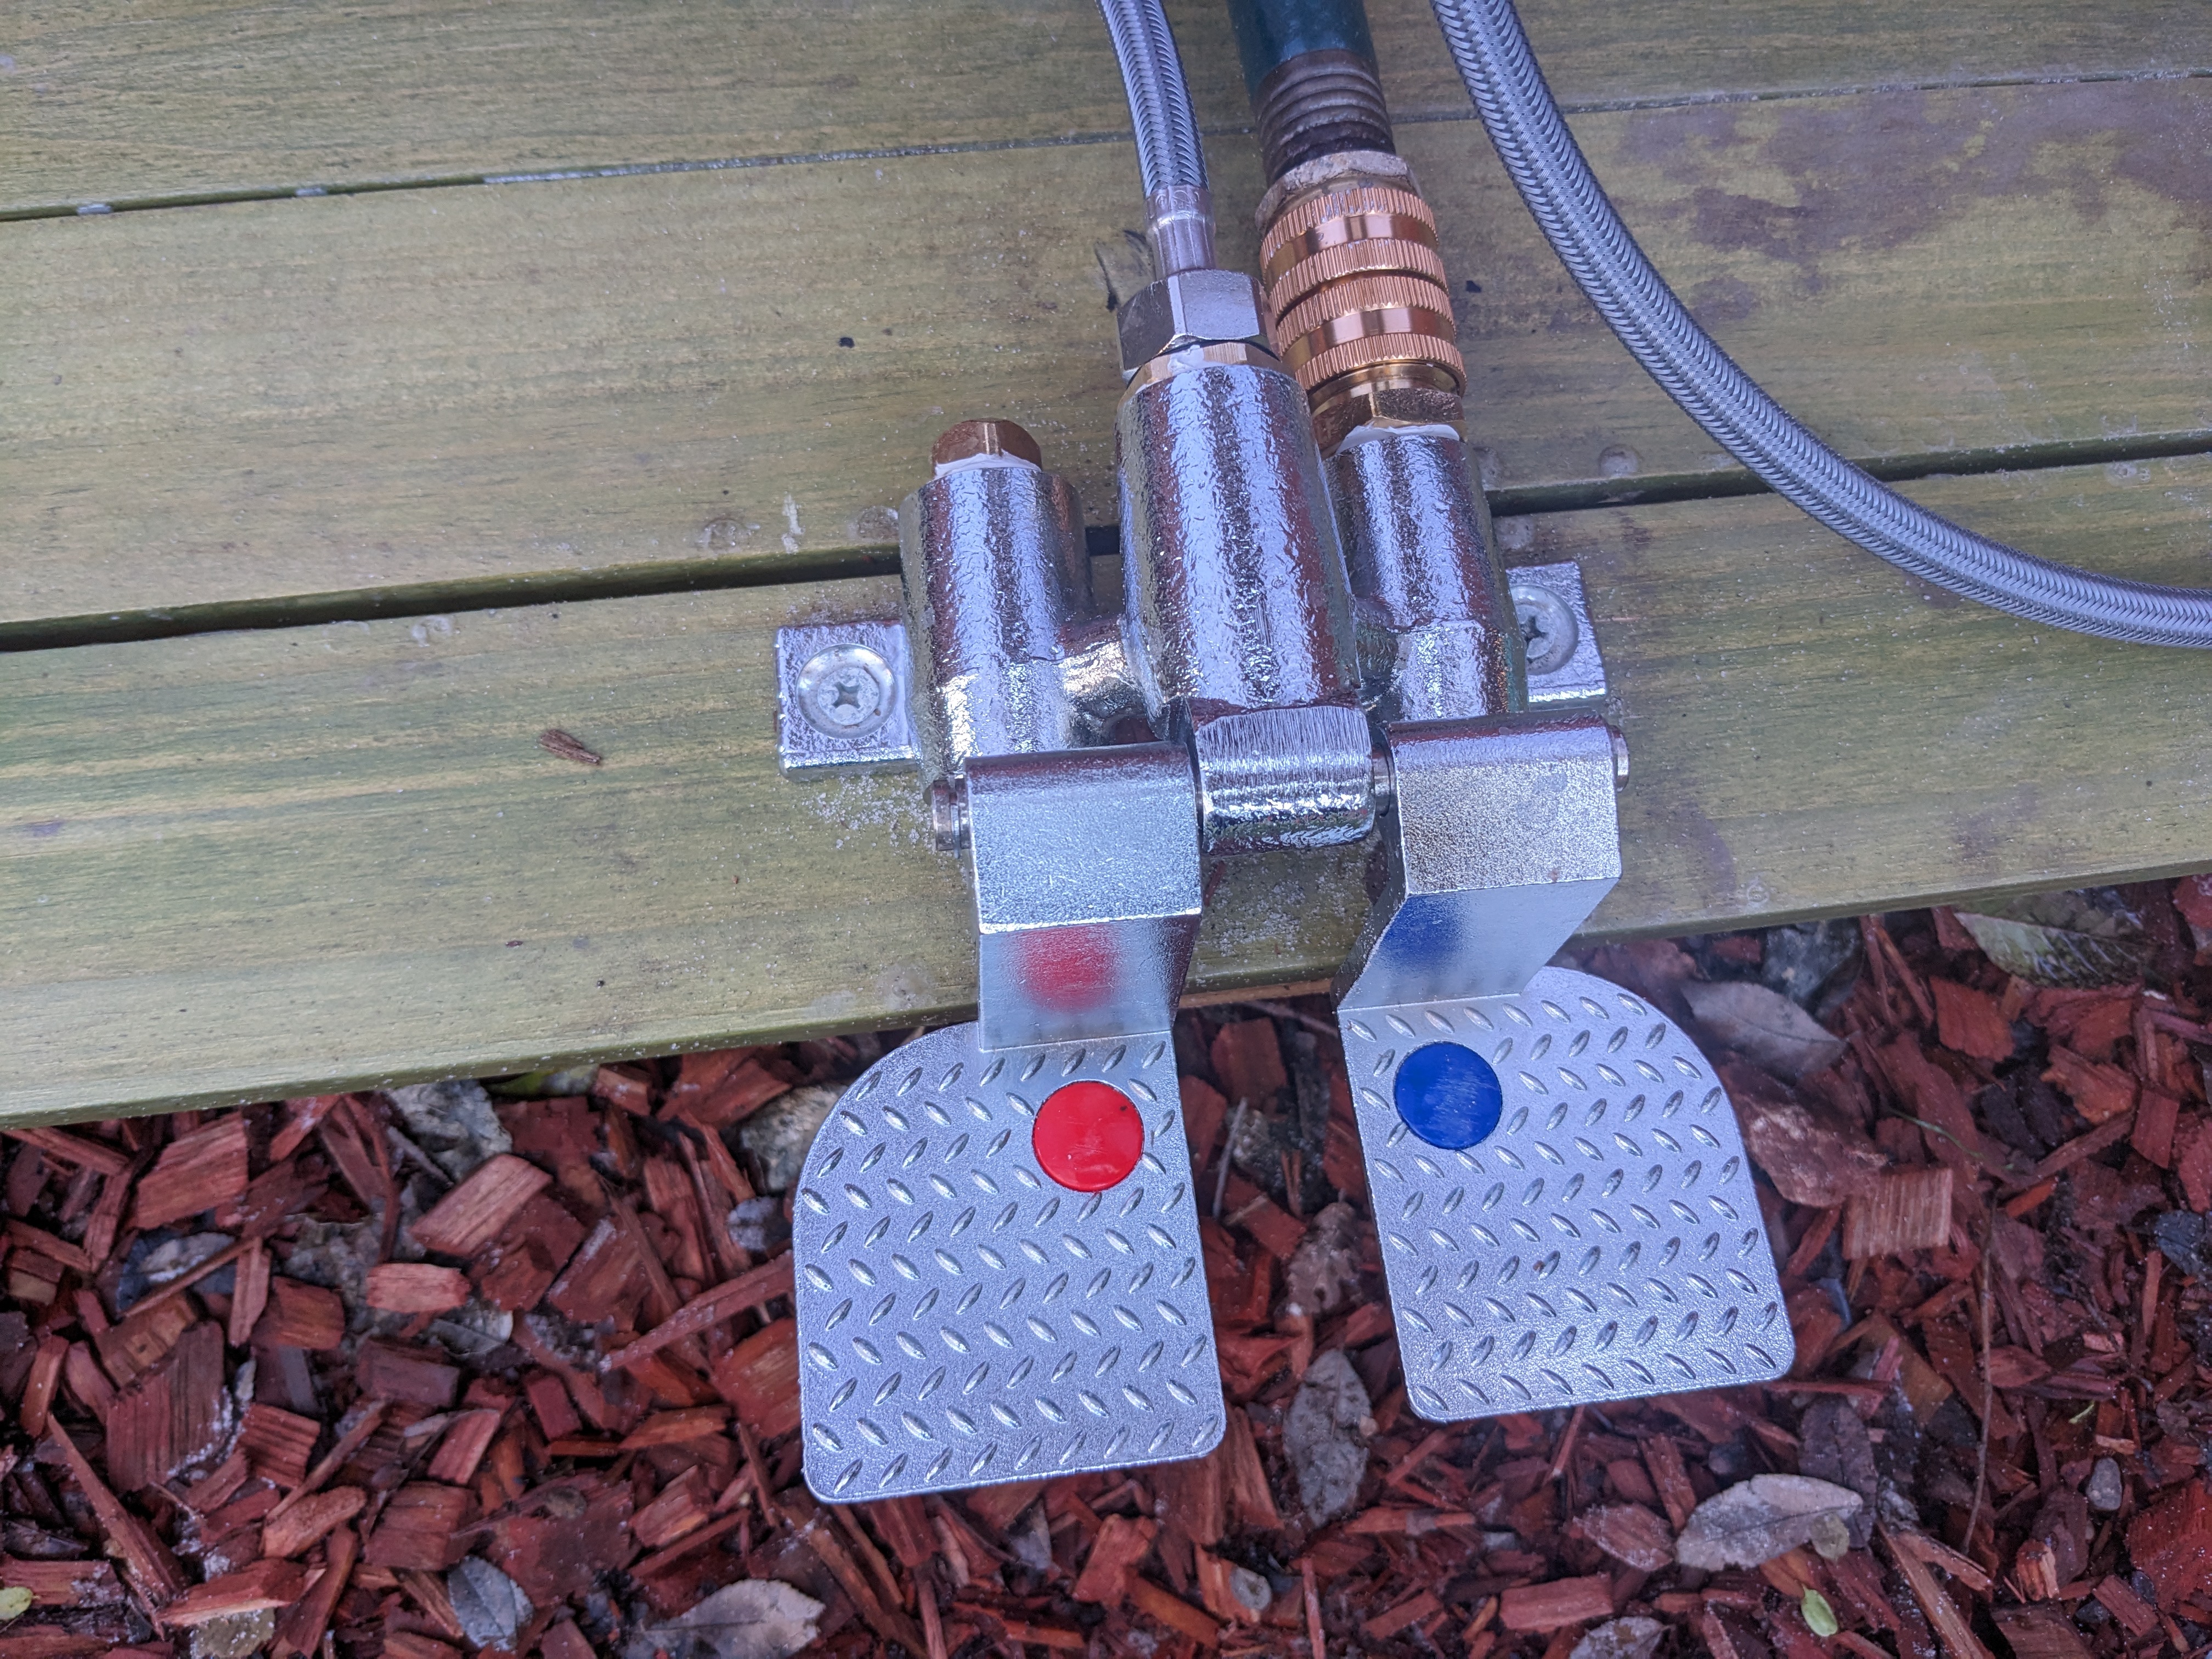
If you’ve got a toddler, you know that water play is a huge privilege for them (and a break for everyone else). The trouble is giving them responsible access to water: if they have a faucet or hose they are guaranteed to leave it running and if they have a bucket they will immediately tip it over. Enter the pedal-activated faucet! With a few mods and extra waterproofing, you can upgrade your favorite sensory table to have running water!
I had a curved space in the front where I wanted garden beds and a toddler barrier. After shopping around I decided on a sliding dovetail design (like this), but I realized that I would need all custom angles to fit my space.
I went with a 2 ft high by 2 ft wide by 4 ft long box size, stringing 6 boxes and 5 wall segments together to complete the garden beds. I used 4″x4″ fence posts and 3/4″ fence planks.
Cutting the sliding dovetail grooves and tongues was a ton of work, but with some careful angles the garden beds fit in the space just as needed. And here’s to the first round of cherry tomatoes!
Don’t forget to plumb up drip lines with dripdepot.com (not sponsored)
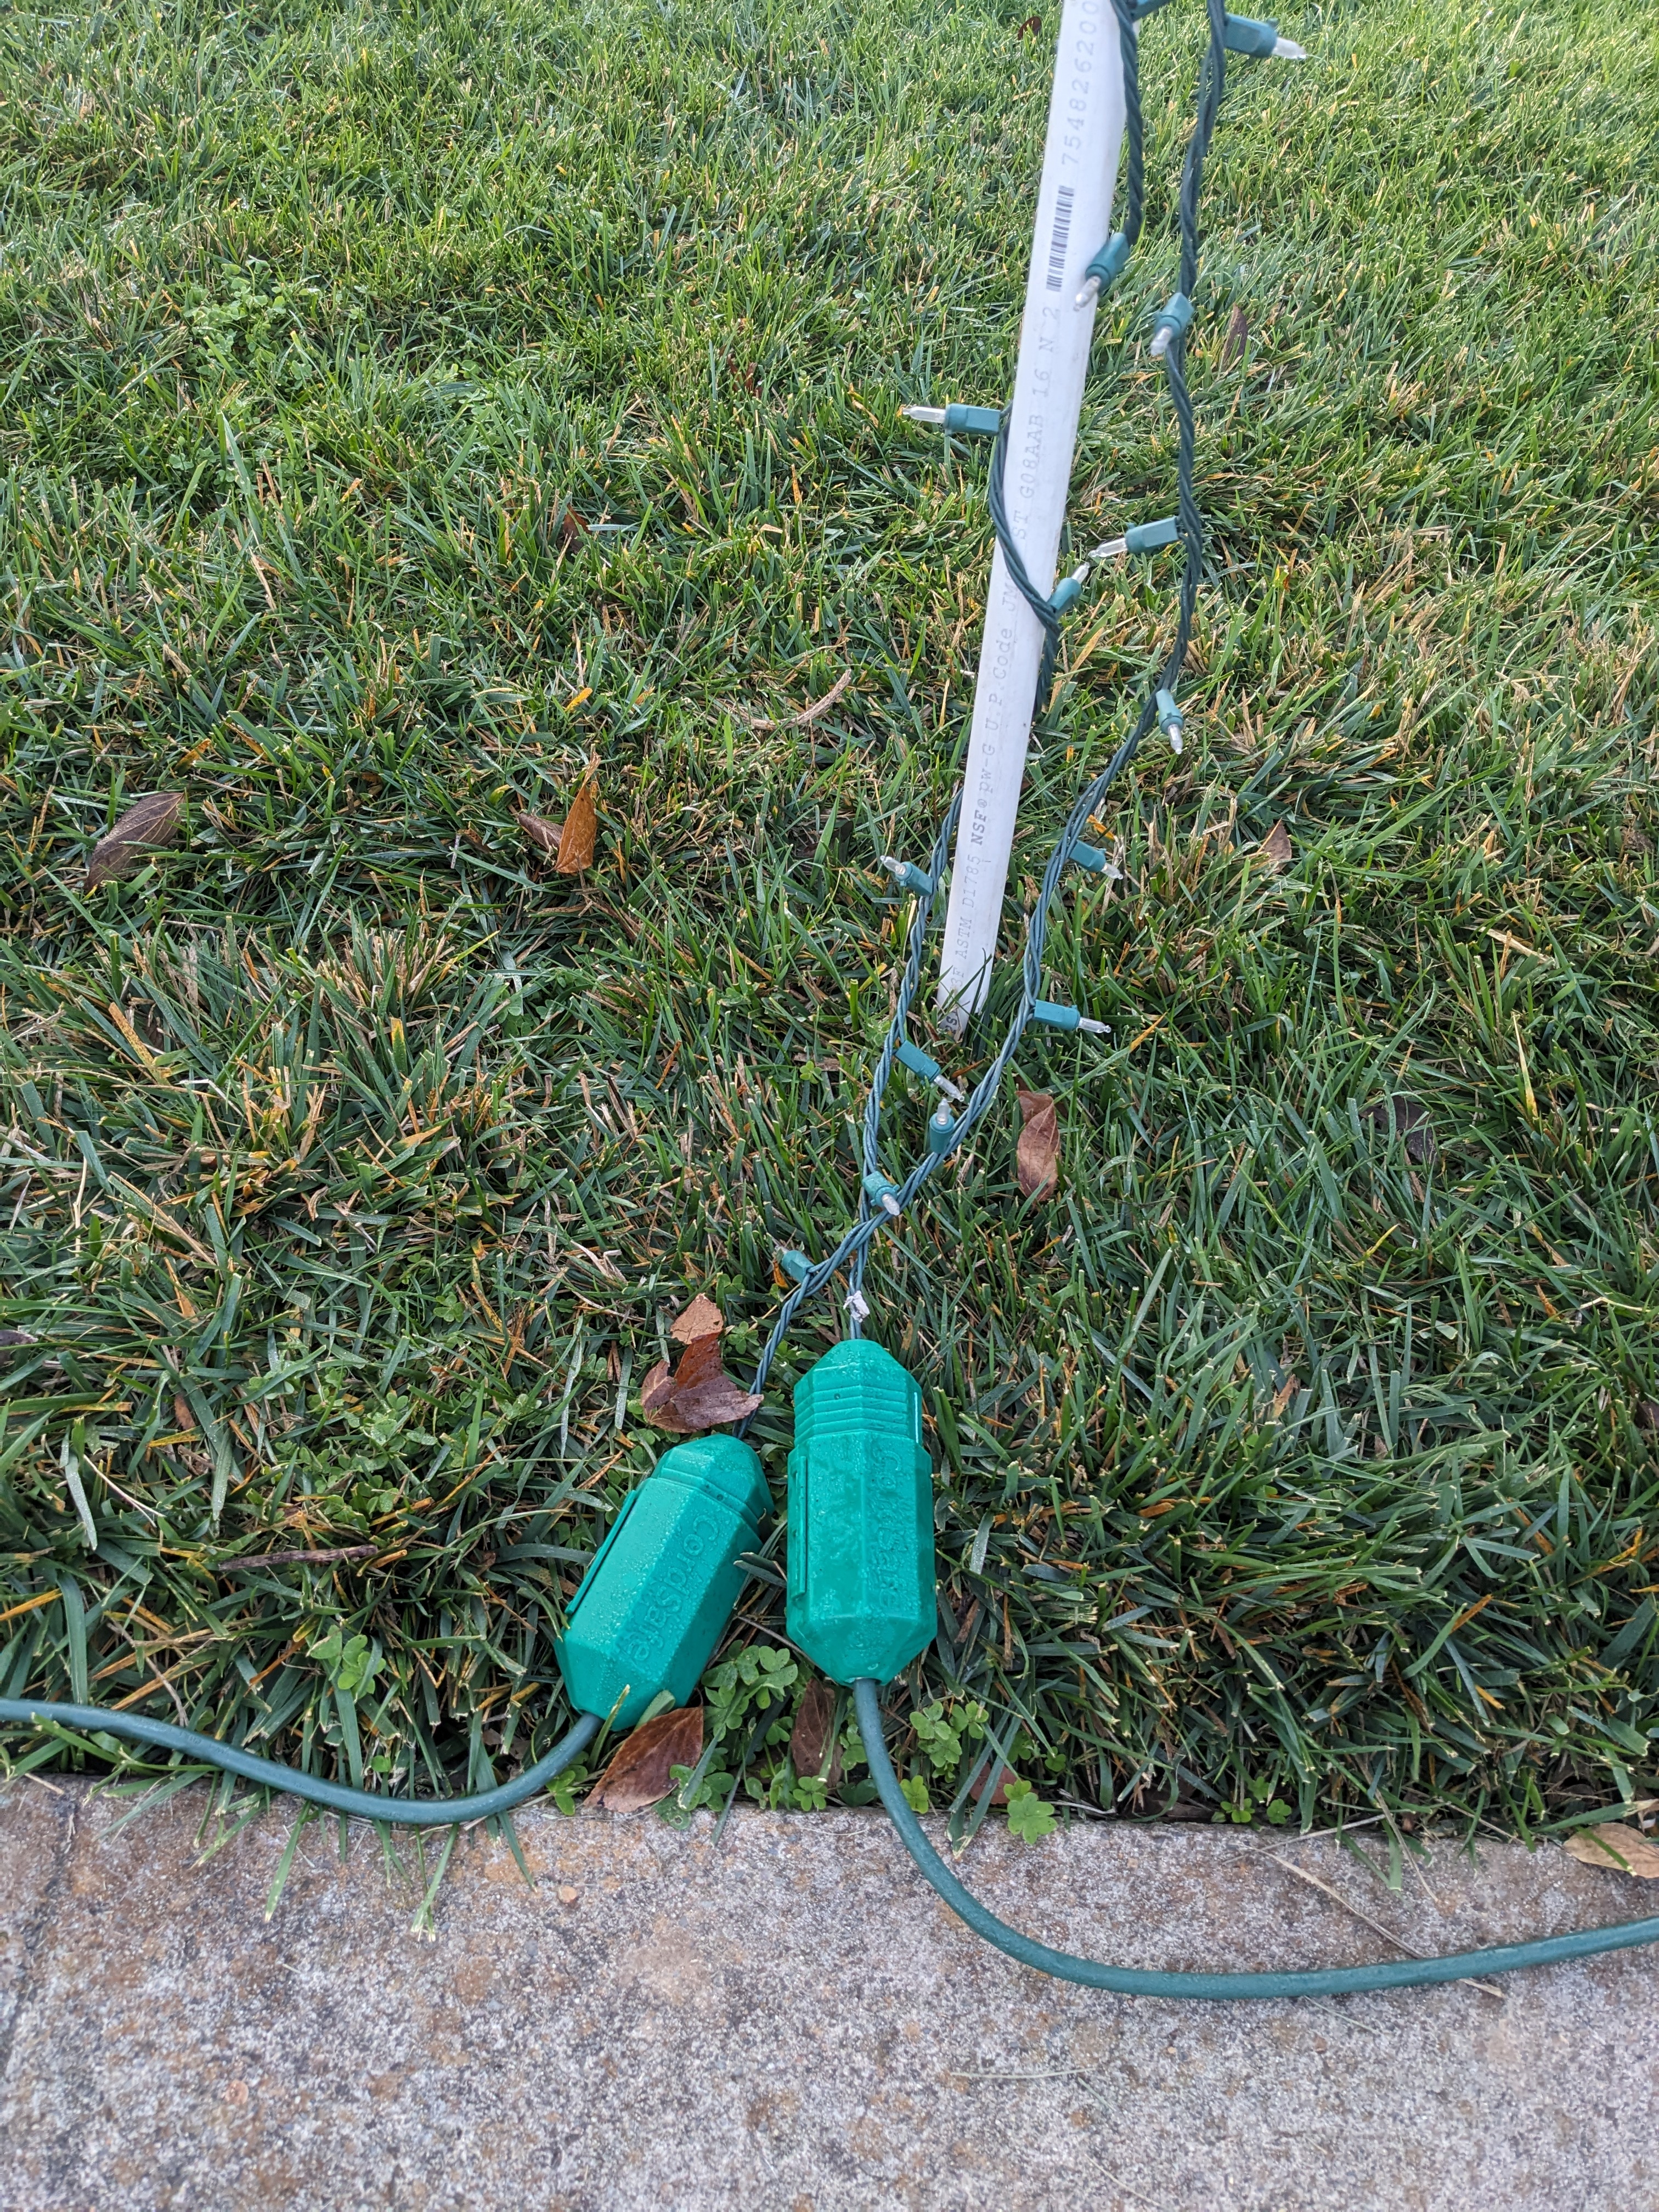
One thing I learned from putting up Christmas arches in 2023 is that the lights don’t tolerate being on the ground very well. The bulbs are not waterproof and the grass stays wetter longer than the arches themselves. Half of my light strands blew out a segment or two and there were too many corroded fitting and bulbs to repair them. For Christmas 2024, I used cord connector covers (like these) and plain extension cords between the arches.
Using the cord connector covers, we made it through a full season with no additional light strings breaking. Seems like the extra parts and hassle is worth the trouble!
Also the PVC certainly embrittles from UV exposure. So far the main pieces needing replacing are the fittings. They were a bit hard for me to find, here are the names for the two adapters:
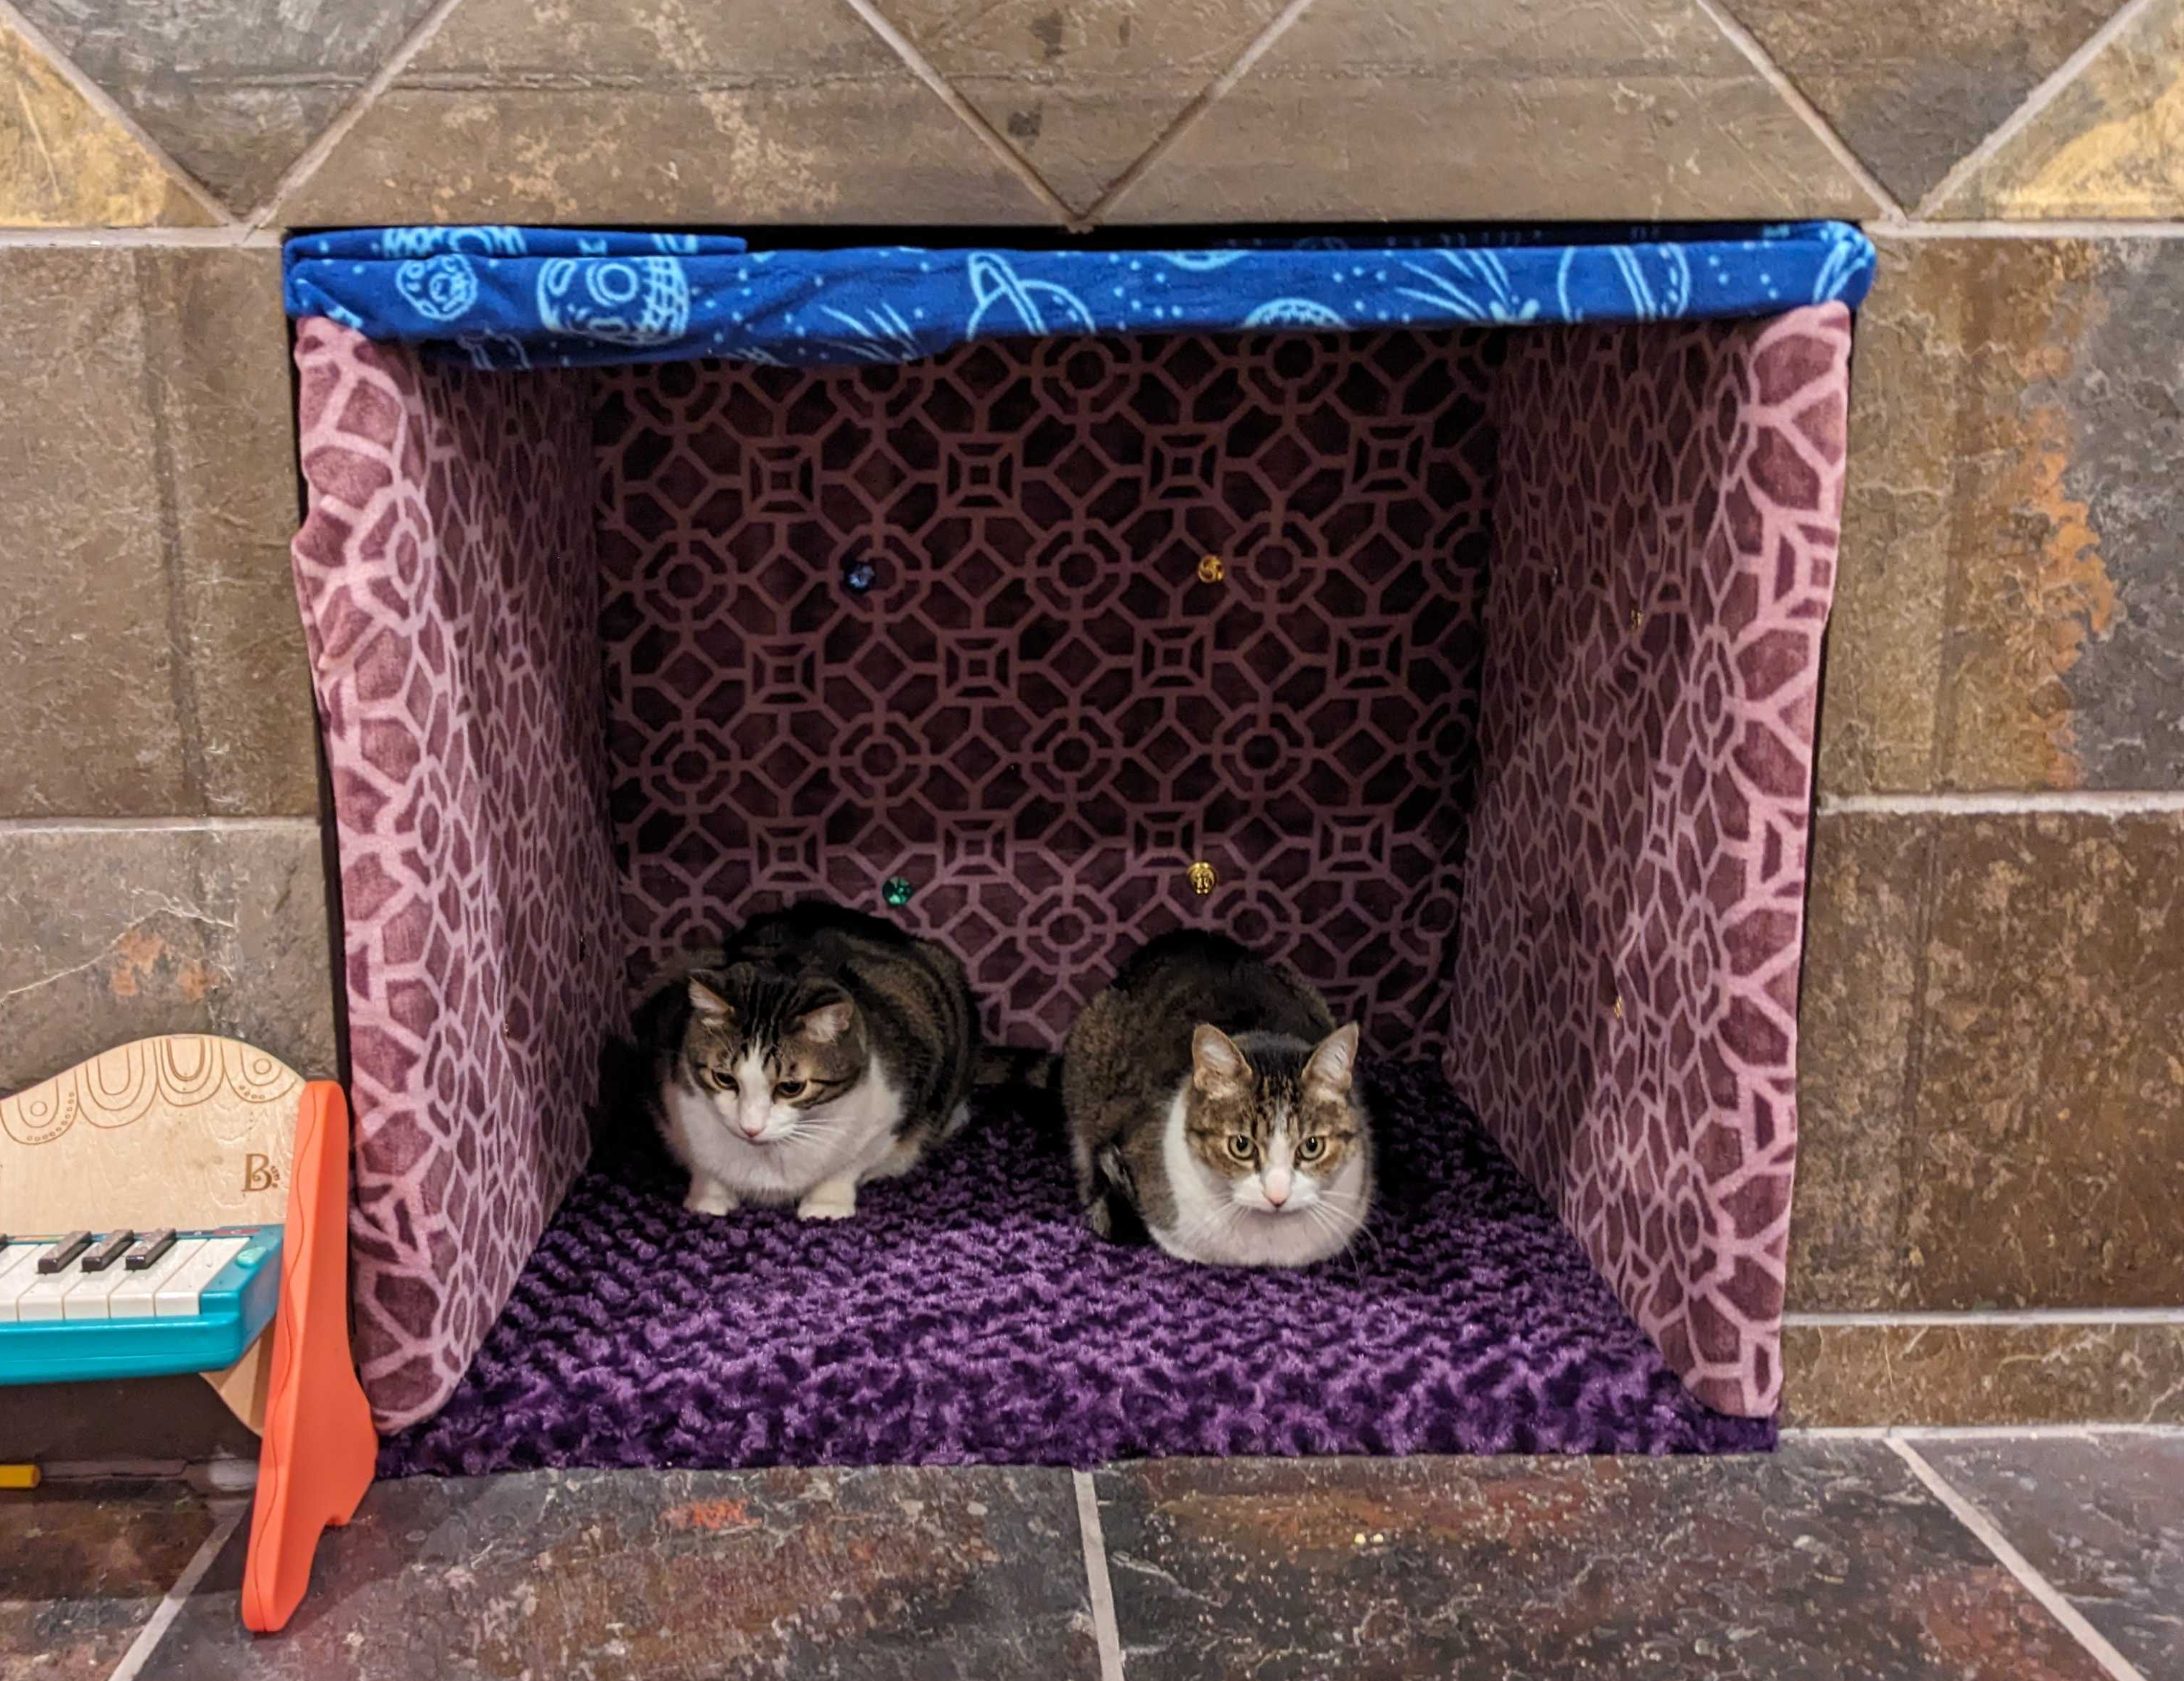
I believe fireplaces aren’t particularly useful. They aren’t efficient at heating a home, they create an ashy mess when used, and they take up a lot of floor and wall space. Perhaps they can be beautiful. With natural gas plumbing, fireplaces let us use an indoor space to recreate gathering around a camp fire. For people without the time or interest in doing a natural gas conversion, please also consider upholstering your fireplace.
Your children and pets may already be interested in your fireplace, exploring and hiding around the rough, sooty surfaces. Upholstering your fireplace transforms it into a comfortable, clean surface and also reduces the thermal leakage through the chimney. Here’s what you need:
Tools: saw, drill, heavy duty stapler, fabric scissors
1/8″ birch plywood, cut to the shape of your fireplace
1″ foam padding
~5 yards of fabric
16 buttons and upholstery thread
First cut the plywood to fit, leaving a little extra room for the foam to compression-fit everything together. Then cut the foam to size, wrap with fabric, and staple the fabric in place. Drill holes through the plywood for the button holes and sew in the buttons. Finally, assemble in your fireplace.
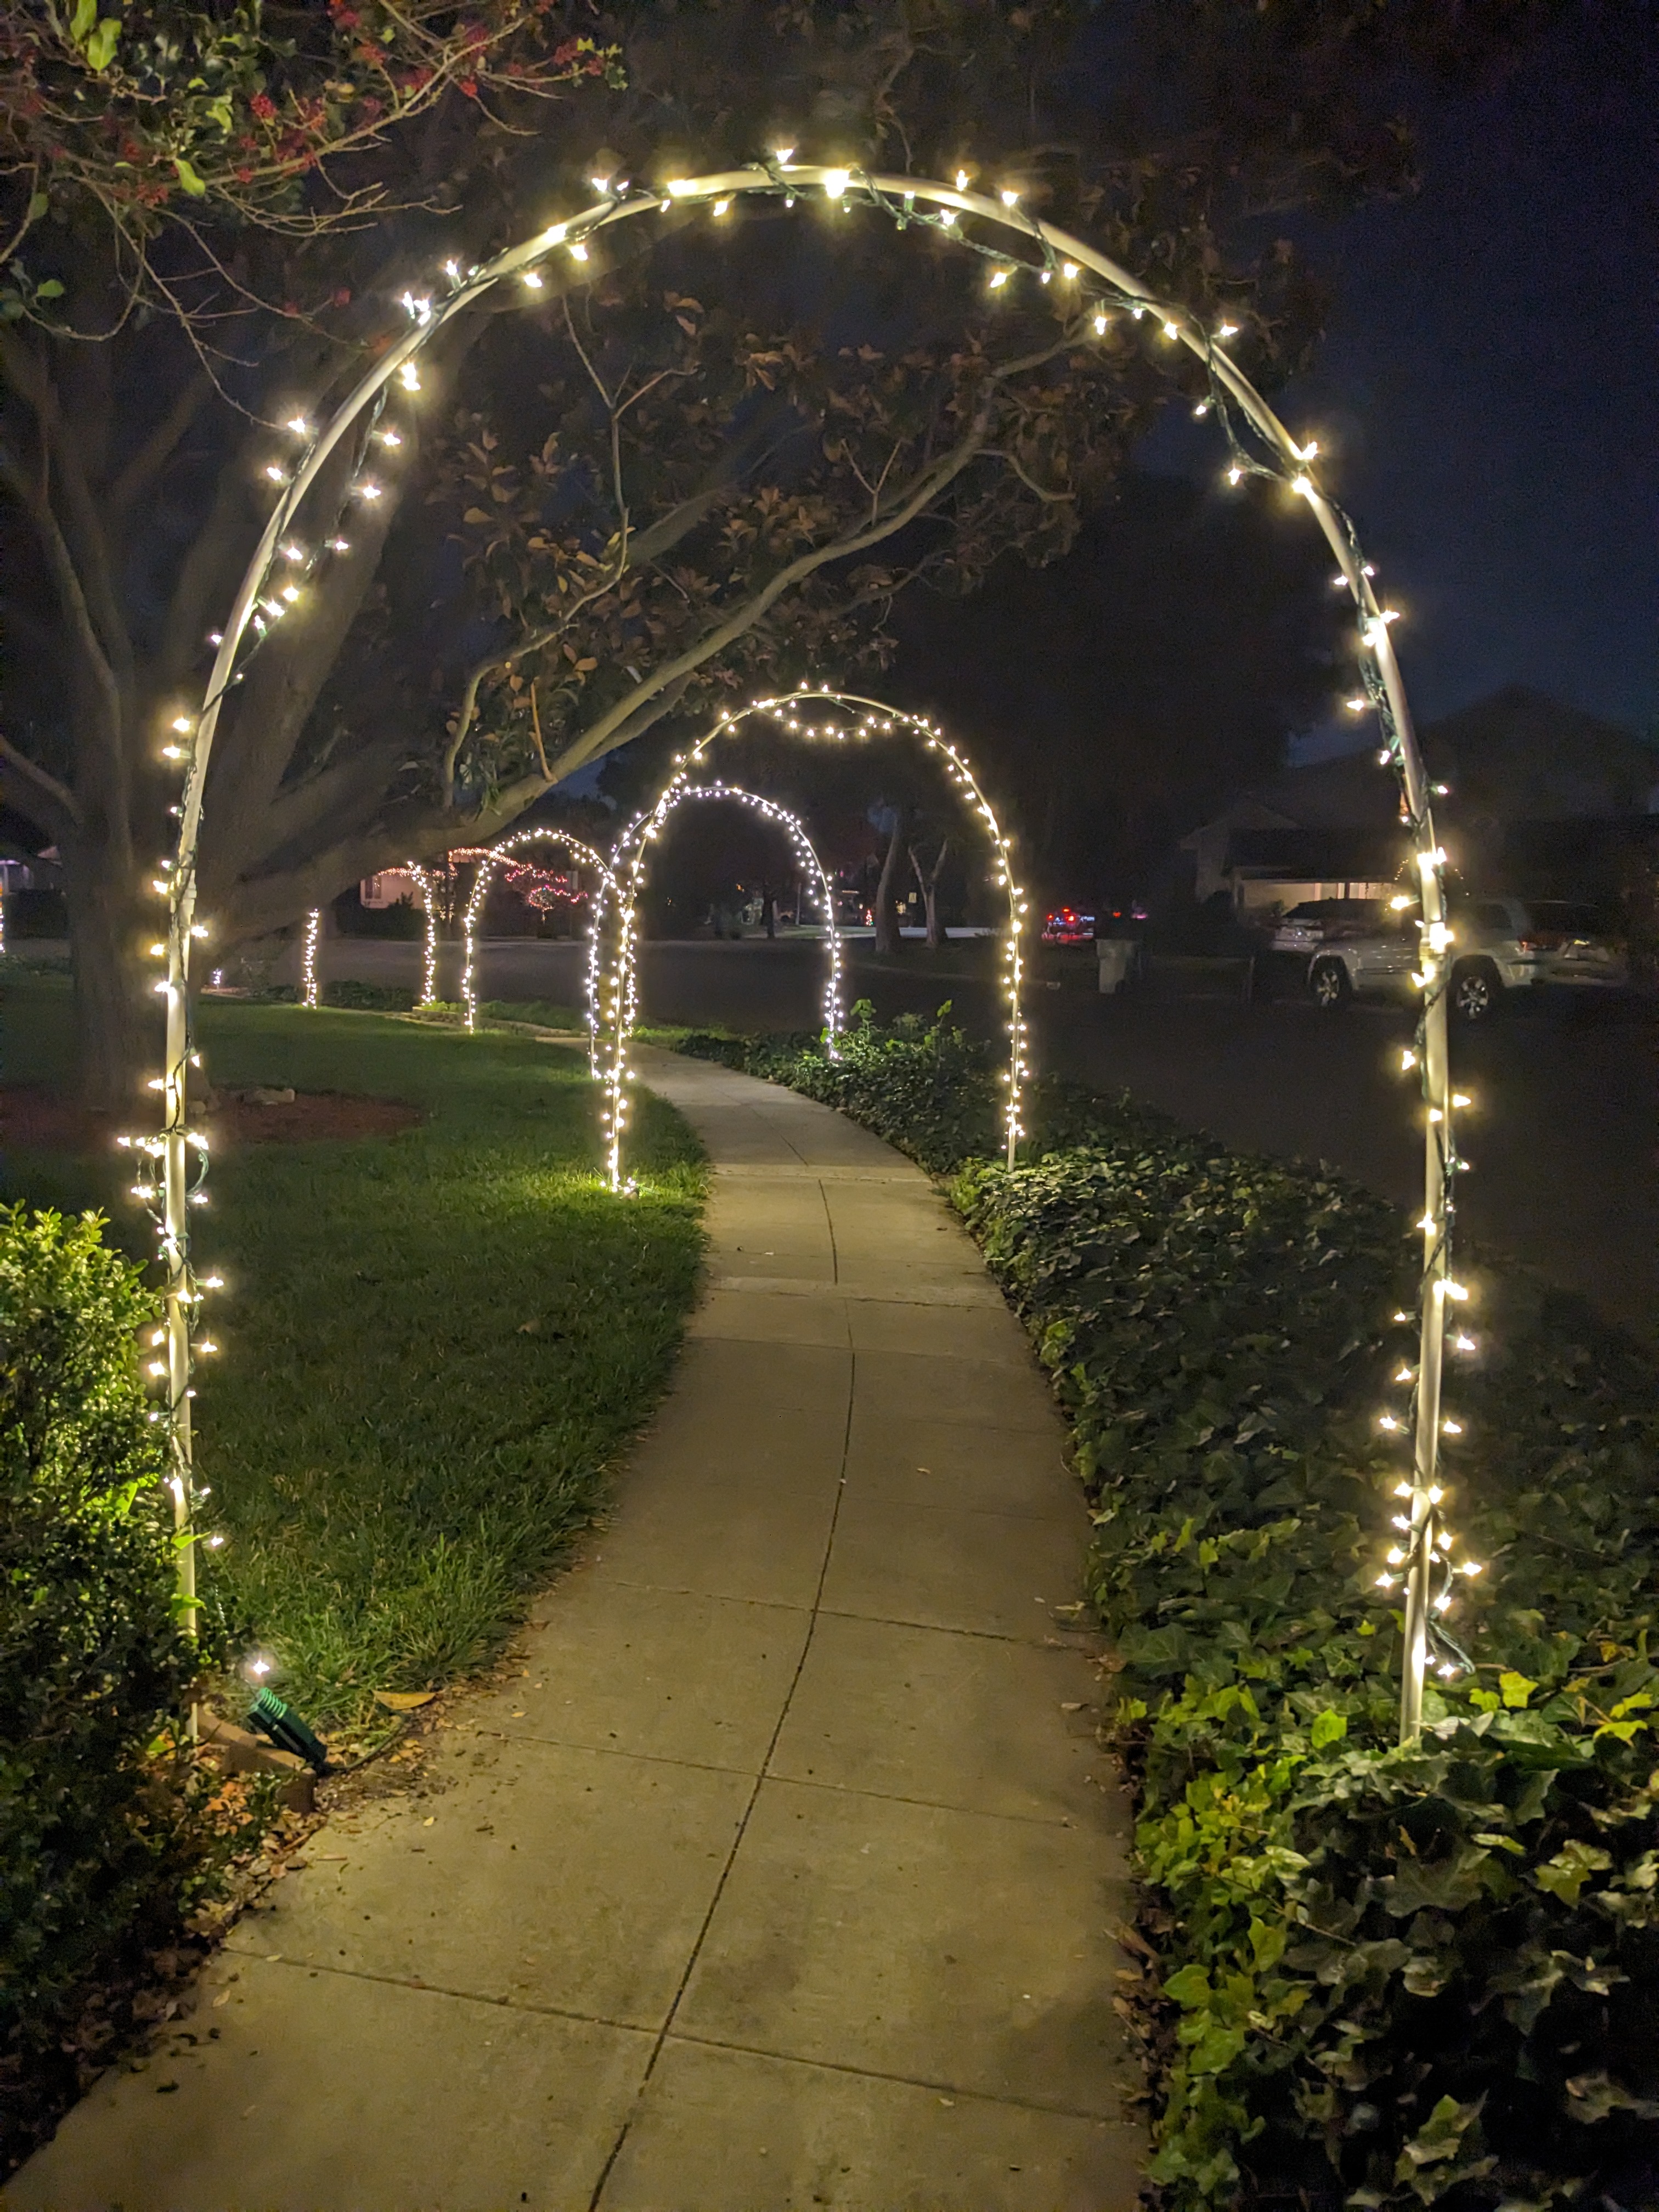
If you’ve explored San Jose during December evenings, you’ve probably seen streets with lighted arches. One of the most impressive examples is Cherry Ave between Glen Eyrie Ave and Willow St.
This year I decided to join the club and build+install Christmas arches for myself. For each arch here are the parts I used:
1x 10 ft 3/4″ PVC
1x 10 ft 1/2″ PVC
2x 3/4″ male fitting
2x 3/4″ to 1/2″ reducer
2x 5/8″ rebar, cut to 2.5 ft
PVC cement
1x strand of ~150 warm white LED lights
First, cut the 10 ft 3/4″ PVC in half into two 5 ft pieces. Then cement one male fitting on each piece. Cement the 3/4″ to 1/2″ reducers to both ends of the 10 ft 1/2″ PVC pipe. Pound the rebar into the ground where you want to place the arch. Then attach the 3/4″ PVC lengths on either side of the 1/2″ PVC pipe. Thread the combined 20 ft pipe on the rebar stakes and string lights to your liking.
I think that the 5/8″ rebar is overkill, probably 1/2″ rebar would work as well. Also you should use an angle grinder to cut the rebar, not a hacksaw and a bunch of blades like I did. Finally, I decided to run lights along the ground instead of using extension cords between each arch. This effect turned out quite nice and required fewer connections.
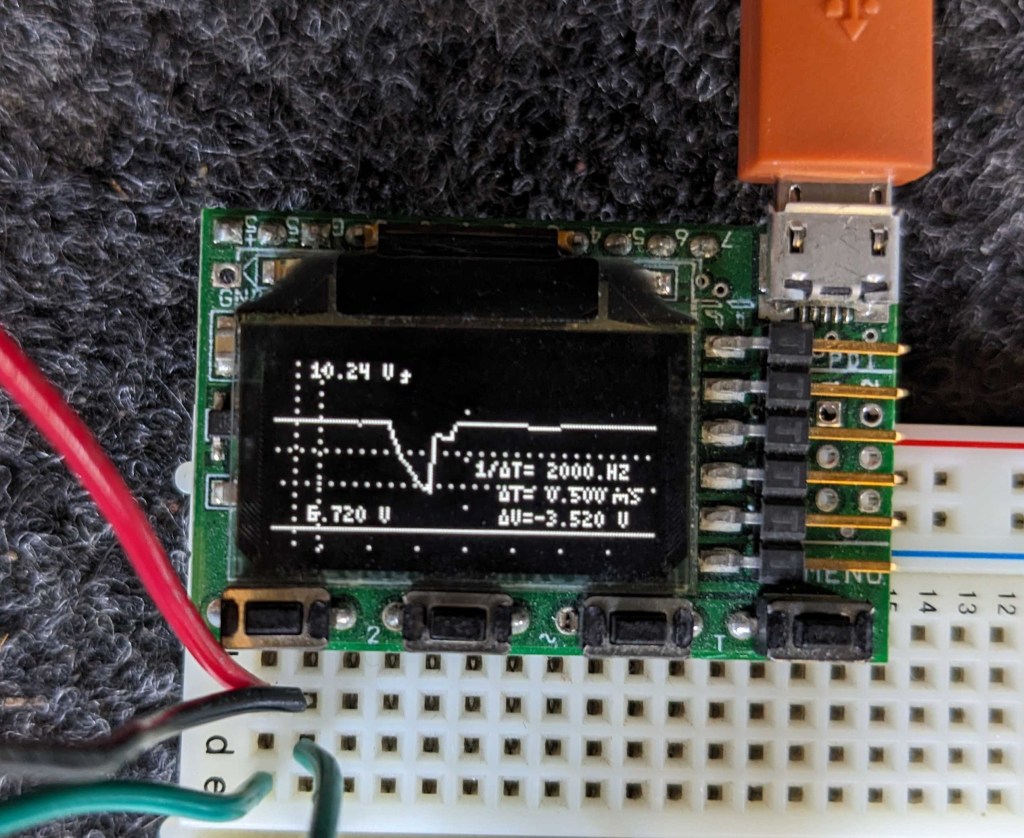
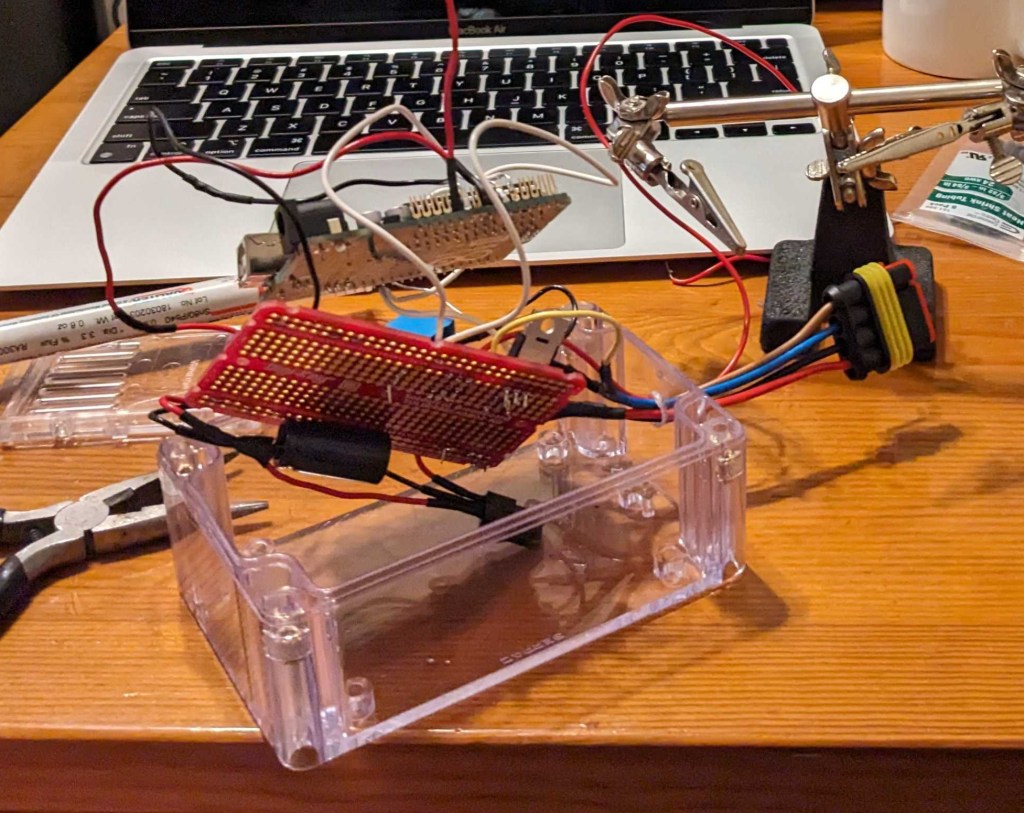
In the last post, my turn signal device worked great when the car lights were running on battery. However, as soon as I turned the engine on the device was caught in a reboot loop.
I hooked up my Xprotolab micro-oscilloscope, while the 2013 VW Passat engine was on, to examine the stability of the 12V running light. To my surprise, the signal showed >6 V dropouts with <5 ms duration and >1 Hz frequency, which means that the power management in my Arduino device needs some updates. The photo below shows the dropouts with a 10 uF buffer capacitor in the circuit.
While sizing a buffer capacitor for the Arduino device power, I realized that I was using a 5V voltage regulator on VIN which has a voltage spec of 7-12V (Arduino R3). So then I switched to a 9V voltage regulator and added a 1 mF buffer capacitor on the output side. Now we are fully functional!
After 6 months of driving with a manual pushbutton left turn signal, I decided it was finally time to build a more permanent solution. In the 2013 Volkswagen Passat, the turn signals always have at least a 33% duty cycle of 12 V powering them, giving a dull glow. Then when the brakes are pressed or turning is indicated, the turn signals go to 100% duty cycle.
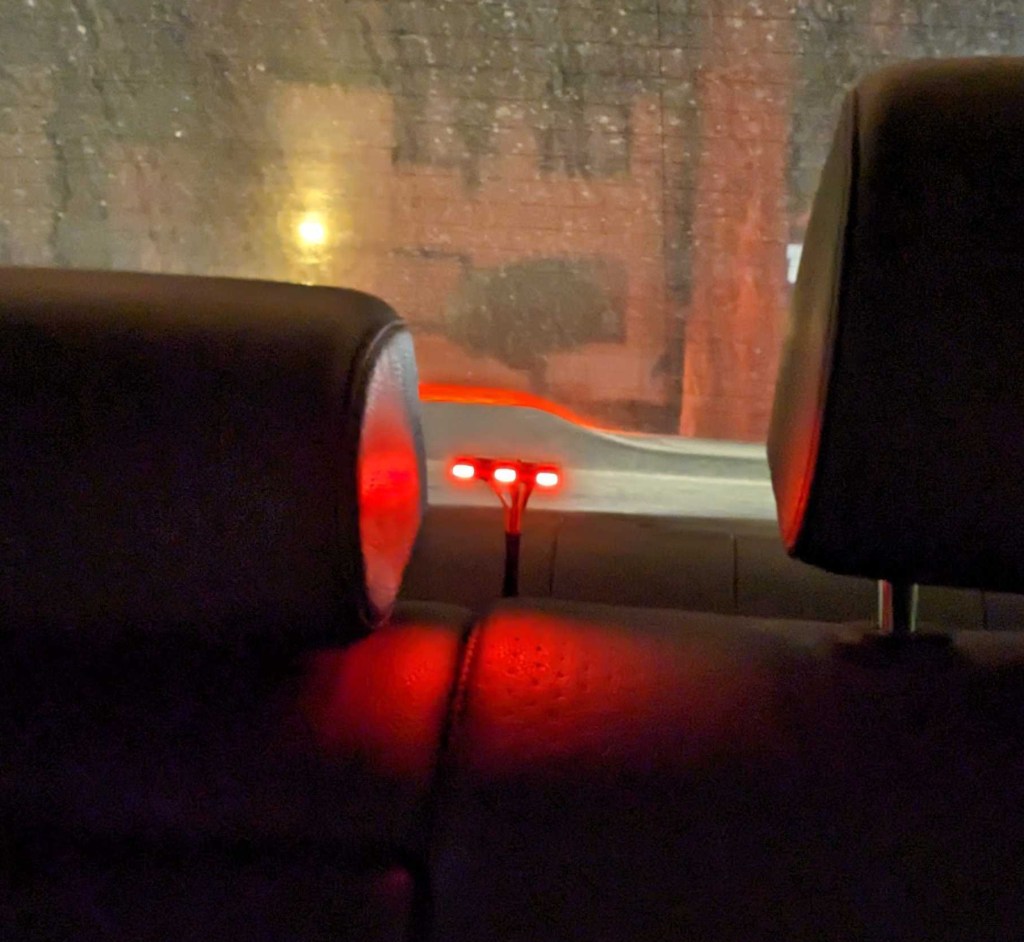
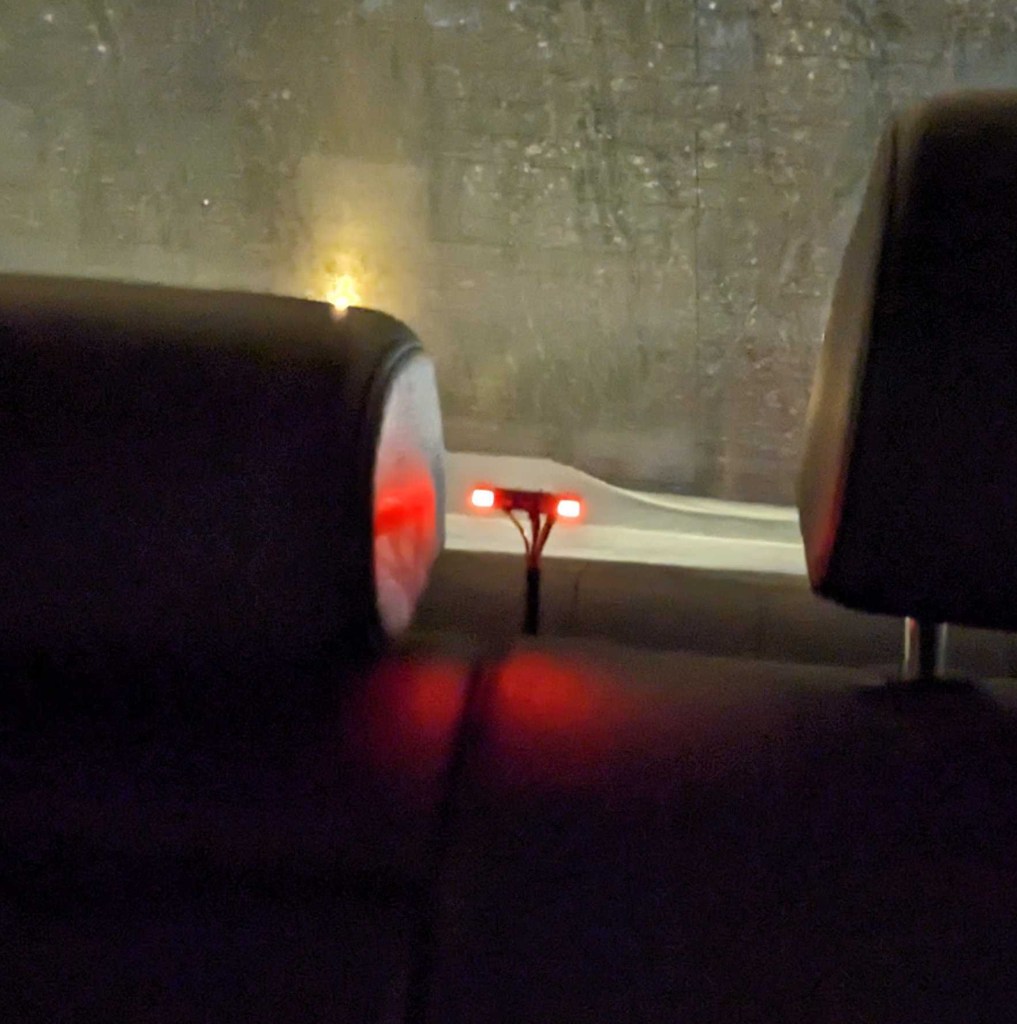
Add an in-car monitor to observe the lighting behavior while driving
Wire up a quick-connect to easily swap devices
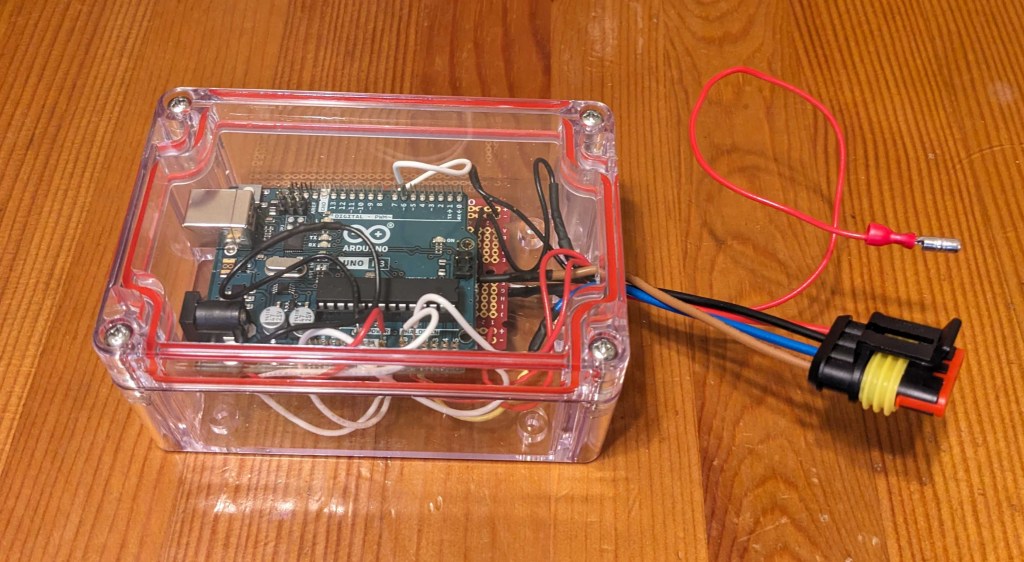
Build and program the “Turn signal Arduino device”
Step 1 was to build and install a lighting monitor module to the car so I could immediately notice any failures with my automotive lighting hacks. The module uses small LED lights to directly show the left turn signal, center brake light, and right turn signal.
Step 2 was to rework the wiring hacks in the car to add a quick-connect junction. My default solution of the manual turn signal would be the “version 0” device and simply consist of two shorted wires.
Step 3 is the Arduino device. For this design I’m using a single n-channel MOSFET as a “low side” switch between the load and ground (controlled by pin 6). Then I’m tracking the brake signal with a voltage divider on analog input A0, and tracking the pushbutton grounding with a pullup to +5V on analog input A1. The next step is to write a simple program to control the logic and heavy use of the “millis()” built-in function. Finally we package up everything into a box and plug it in!
In this ongoing series, I’m documenting the changes to my busking drumkit. It’s been about 4 years since the last update, and some important things have changed. Let’s start with a photo:
The kit includes an 18″ pancake bass drum, a 14″ steel snare, 14″ New Beat hats, 14″ Paiste fast crash, and a 16″ Byzance dark crash.
Since the last update, I decided that the trash can bass drum idea was strictly worse than using an actual drum. You get much better resonance with a clean bearing edge and a round, sturdy shell. Pancake bass drums can get a great sound, as long as you are careful to deliver clean strikes with the beater. I also decided that mini-snares (such as the 10″ M80) are not for me. You need a full-sized snare if you want clear stick shots, full-sounding shuffles and commanding rim shots.
Moving to cymbals, the 16″ Byzance dark is still here. Given the constraint of cymbals that fit inside of an 18″ bass drum, the 16″ Byzance is dry enough to ride on and comes with expressive crash and bell sounds. The goofy splash hats from last time also had to go, because the sizzles and barks from full-sized hats sound much better. I’m also keeping the 14″ fast crash from last time, except now it has it’s own mount which means it’s bright, clear bell is now accessible.
Final thoughts on portability – the hardware, throne and snare drum all fit in the luggage, and the bass drum doubles as a cymbal case. It’s pretty easy to sneak in and out with this setup, and always in one trip.